

Soft, baby gloves for all the steps you’d ever need to master GitHub enough to put in on your resume. And a soft introduction to Git, too.
It was about a year ago. I had worked on a mini-project. I was required to upload my working files in a GitHub repo and share the repo URL. I’d finished working on the project and all that remained was the GitHub part. My palms got sweaty. I looked at my reflection in the windowpane and I could see some new white hair strands sprouting by the second on my head. My breathing got faster and I was passing out. Before I’d say, Jack, I was in ICU and I was mumbling to the doctor that it’s either GitHub or my life.
Maybe I exaggerated a bit but that is (almost) the exact way most developers feel the first time they’re required to use GitHub. Maybe the second time, too. Maybe up till they read this article.
But we’re in 2020 today, and there’s no buttering up this. You need to know how to use GitHub (and Git)!
Teams are working remotely more than ever before. By being a member on GitHub, you get to rub shoulders, minds (and souls) with Tech giants like Google, Facebook, Mozilla, etc. You get to learn and work alongside world-class developers scattered all over the globe, that you normally won’t have the opportunity to. But Git and GitHub are so terrifying that you’d probably want to pass up all these mouth-watering benefits in exchange for not having to work with GitHub for the rest of your life.
Partly, it is your fault. Your fault is being human, and humans fear what they do not know.
And partly, it is not your fault. Almost all the “GitHub for beginners” tutorials I’ve seen out there were way over my head, which is the chief reason for me writing this tutorial.
Thinking of GitHub in another Paradigm
One big misconception is that GitHub is a development tool like programming languages and IDEs. But it’s not.
Just like Twitter, Facebook, and Instagram, GitHub is a social network. It is the social network that’d change the way we work. It is the largest online storage space for collaborative works in the world.
This means that you get to build a profile, “follow” other users and upload projects to share and you could also get “likes” on your best projects. And while many users store their coding files on GitHub, that doesn’t stop you from storing your text documents and other file types on GitHub.
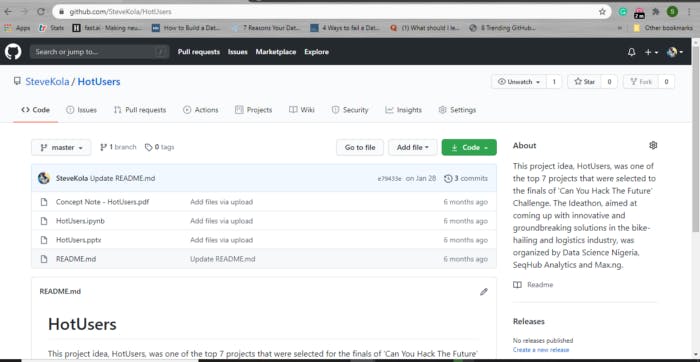 I saved a pdf and a PowerPoint presentation on GitHub
And finally, GitHub has the best “terms of agreement” among all the social platforms. GitHub doesn’t claim ownership of your files (or projects) in any way. All your intellectual properties remain yours and yours only.
So what is Git?
Git is a Distributed Version Control System, which means that it makes changes to your tracked (or hosted) project without overwriting any part of the project. Most real-life projects do have multiple developers working on them concurrently. Git ensures that there are no conflicts between the developers’ individual contributions to the project.
What then is GitHub?
Unfortunately, Git is so ancient that you’d have to make use of the command line (or terminal) to access it and you’d also have to write code snippets like Hollywood hackers. And this might be a tad difficult for modern computer users. And that’s where GitHub comes in.
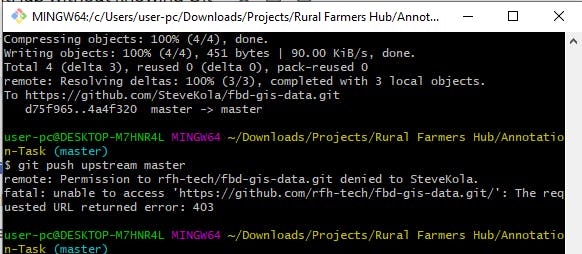 Looks like I’m hacking, yeah?
GitHub simplifies Git in two ways:
You can download the GitHub Desktop. It provides a simple visual interface to manage your version-controlled projects locally.
You can create an account on github.com, upload your version-controlled projects on the web, explore other users’ projects on the web, and use other features synonymous with social websites.
My Two Cents, Ere We Progress
I’d mostly advise one to learn how to use Git. Even though it is very possible to use GitHub without knowing Git (I learned to use GitHub before Git), there’s a big gap between using and understanding.
However, you might be on a deadline or something, which requires you to use GitHub as soon as possible. And also, learning GitHub before Git allows you an easy and smooth transition into Git.
Creating a GitHub Repo
A Repository (Repo, for short) is a directory or storage space where your project is stored. You’d normally have one repo per project. You can keep code files, text documents, and likes in a repo.
You have to own a GitHub account before you can create a Repo. Creating an account is the easiest part. Go to github.com and create one.
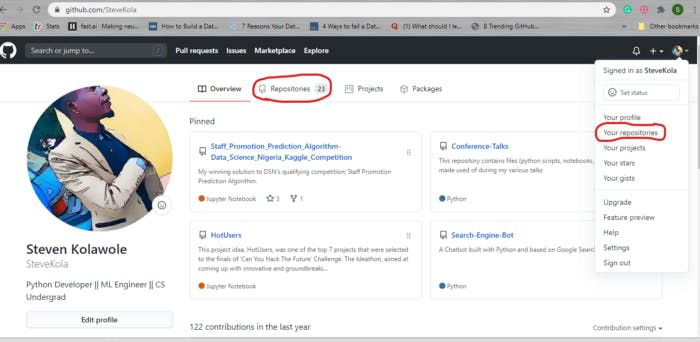
Once you are on your GitHub profile, there are two ways to go to the Repositories tab, click on either of them.
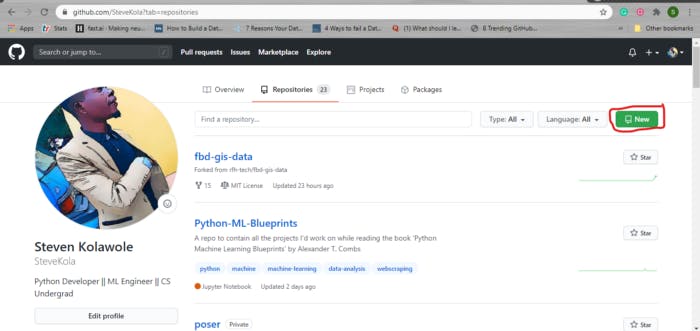
Click on New.
Go ahead and input a short memorable name for your repo. Leave it at public for cruise. Why should you hide your attempts at trying to learn GitHub?
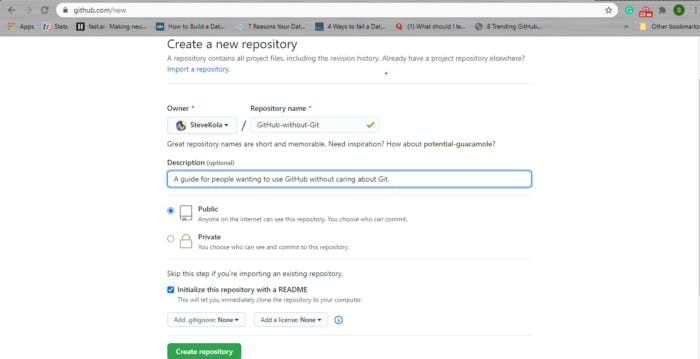
The description textbox is optional.
You can decide whether to click Initialize with a README checkbox or not. A README.md file is basically a text file that explains what your project is all about. You can do that later.
If you click Initialize with a README, whatever you write in the description textbox would be saved as your README.md.
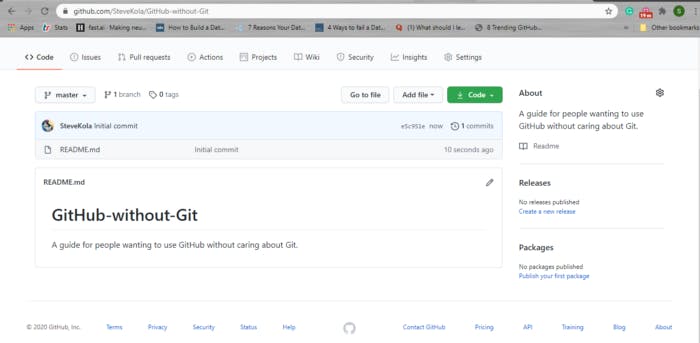
Click on the green Create repository once you are done, and that’s all about creating a new project repo on GitHub.
Uploading Files to a GitHub Repo
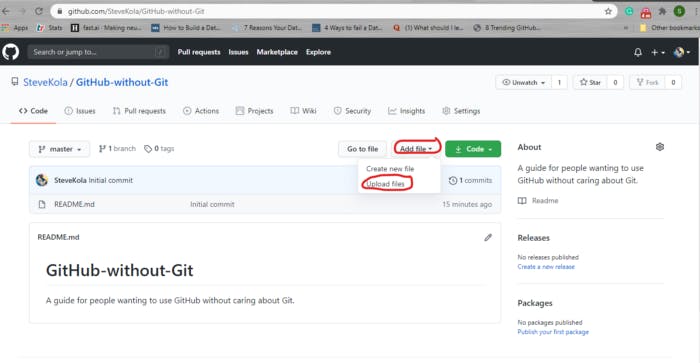
If you are not a hardcore programmer, uploading your files to a GitHub repo is what you’d be doing 90% of the time. To upload your files, click on the Add file dropdown, and select Upload files.
You can choose to either drag your files to the space or click choose your files. Feel free to upload more than one file at once.
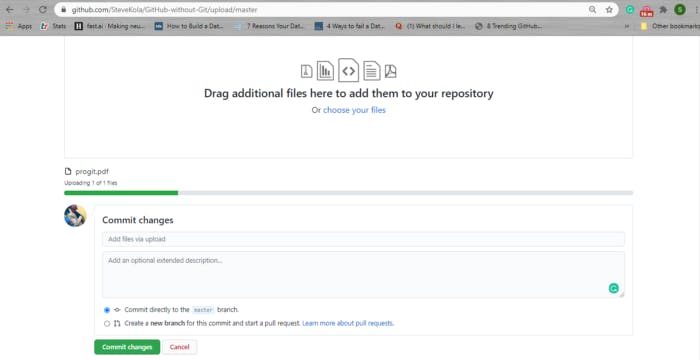
You can leave the Commit changes section as it is. Commit is what gives Git its power. It is simply a checkpoint to which you can restore your project to a previous state. Don’t fret if you don’t understand this for now.
Click on the green Commit changes and that’s it!
Creating a New File on a GitHub Repo
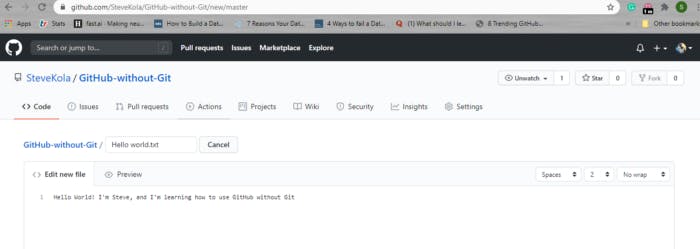
Sometimes, you might want to create a file, a README.md for example, in your repo. All you have to do is to click on the Add file dropdown and select Create new file.

Insert a file name and its format (.md, .txt, .py, .pdf, etc), and pour your heart out in writing.
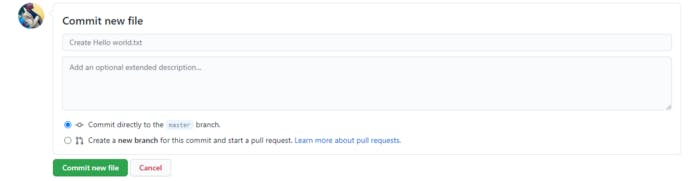
Click on the green Commit new file and you’re done!
Creating a New Folder
Yes, you can create a new folder on GitHub. To do that, follow the same steps as Creating a New File. Instead of inputting a file name, insert your folder name and add a forward slash / afterward.
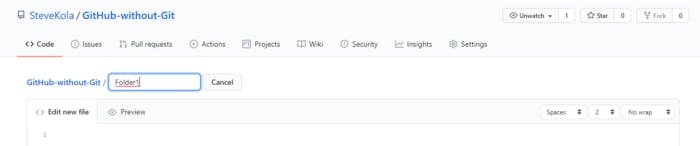
Viola! Now you have a new folder. But wait a minute! You can’t just leave the space empty. You have to commit a new file before you can have your precious folder.
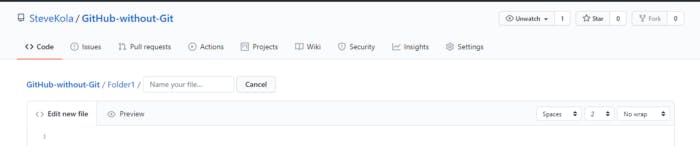
So you can create a new text file or a README or something. But what if you don’t want a new README inside your new folder? Maybe all you want in your new folder are some files to be uploaded.
Then write .gitignore as your new file name.
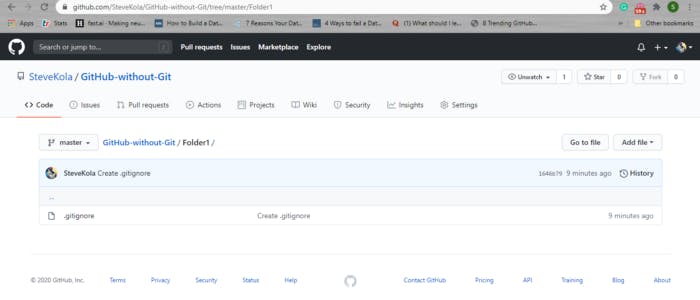
Don’t bother about what .gitignore does for now. All you need to know is that it does nothing and you can have your new folder now. Click on the green Commit new file and here’s your folder!
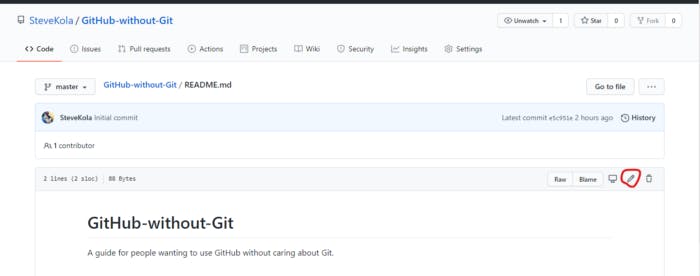
Editing an Existing File
90% of the time, you’d want to edit your README.md. As a matter of fact, you’d probably edit it more than once. But do take note that editing existing files is not limited to README files. You can edit any file right there on your GitHub page.
Click on the file and click on the pencil icon. Be aware that the trash icon next to the pencil icon is for the deletion of the file.
Contributing to Other Users’ Projects
One of the main ideas behind Git (or open-source, for a broader term) is that by sharing our works publicly, we can build better projects. As people from all walks of life can contribute to our projects.
Here are the steps to follow when contributing to others’ projects (detailed explanation later):
- Fork the repository
- Making the fix.
- Submit a pull request to the project owner.
If the project owner likes your fix, they might merge it with the project!
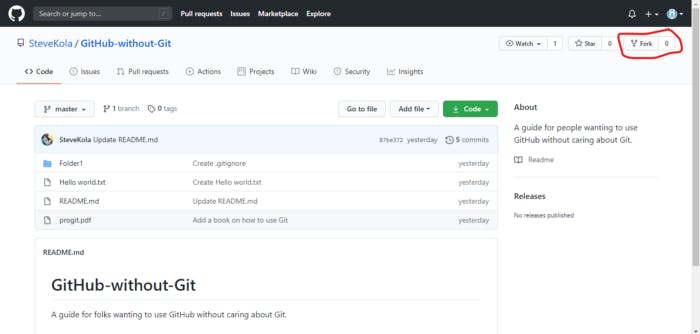
Forking a Repo
A fork is a copy of someone else’s repository. Forking a repo allows you to experiment with changes to someone else’s project without affecting the original project.
Use cases of forks are when we’d like to propose changes to someone else’s project or when we’d want to use the project as a starting point for our own idea.
To fork a repository, navigate to the project’s page on GitHub. For tutorial purposes, we’d be using our old, faithful repo. Click on the fork on the top right corner. The process will take a minute or so and you’d have a copy of the repo as your repo.
Making a Fix
Now you can start contributing to the project! For our purpose, edit the Hello world.txt, go to the next blank line and write that same sentence, modified with your name.
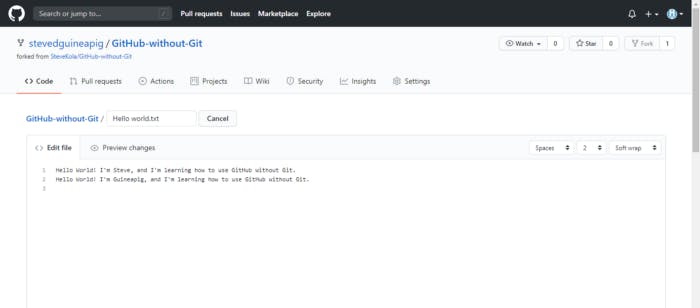
Once you are done, commit your changes.
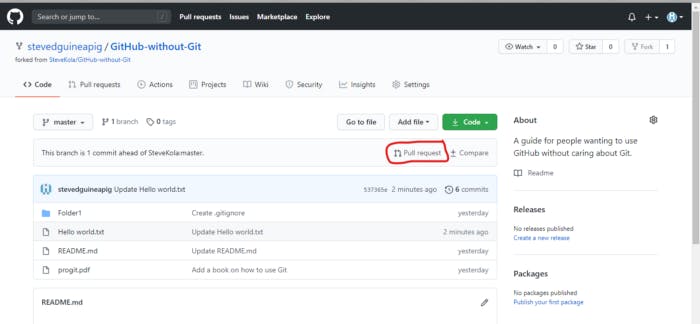
Submitting a Pull Request
To submit a pull request, click on Pull request on the project’s main page.
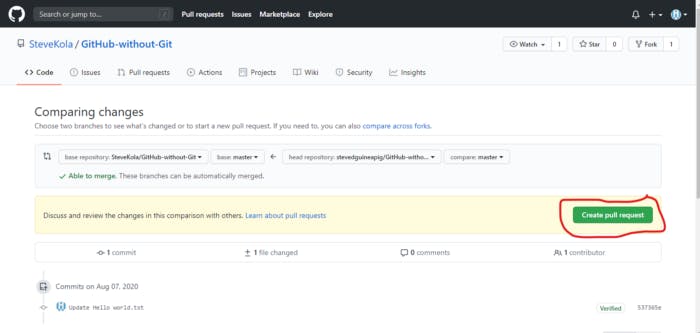
Click on Pull Request on the next two pages and that’s it!
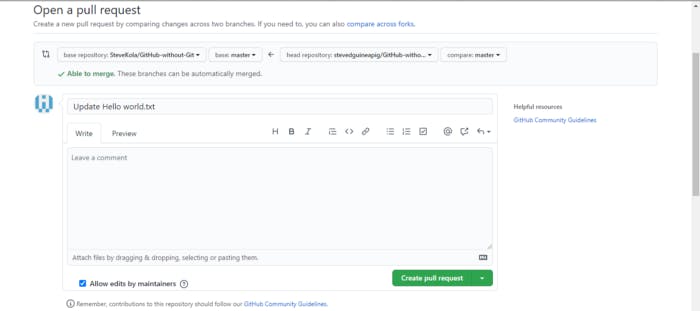
I’d be notified by mail that you’ve contributed to my project. I, in turn, would be so mesmerized by your pull request that I’d merge it to my project in a jiffy. You also would be notified by mail once I approve your pull request.
Congratulations! You’ve made your first meaningful contribution to someone else’s project. Having done that, you’ve mastered all the basic GitHub skills you need to know. So, double congratulations!
Next Steps
Now that you’ve done justice to GitHub and you can wield it confidently, the next righteous thing to do is to master Git.
If you’re a programmer, mastery of Git is a necessary feather to add to your multi-colored cap. Here’s a link to the best book you’d ever find on Git, written by the Git caretakers themselves. I also included the book in our overused repo. You may download it there.
Too Long; Didn’t Read
In this article, we had a paradigm shift concerning how we think of Git and GitHub. Then we went through the process of creating a GitHub repo (repository, for long) for our projects.
Afterward, we uploaded new files to our new GitHub repository.
We created a new file and a new folder. We also edited an existing file.
And we contributed to someone else’s project by forking the repo, making a fix, and submitting a pull request.
Having been baptized in the brook of GitHub, I finally recommended that you’d eat your frog called Git, by using the best recipe on Git.
In Conclusion,
If you enjoy this article, clap 50 times, share with others who might need it, and say hi to me on Twitter. I’m also on LinkedIn sniffing at job boards.
Thank you for reading, and have fun learning new, exciting stuff. And hey! You didn’t mind my red, ugly freehand sketching, did you?